
Configuring the TestRail connection
The Snapshots integration with TestRail lets you add TestRail data to your snapshots. The integration is provided by a companion app called Snapshots for TestRail Data into Confluence, which adds a TestRail connection tab to the main Snapshots Configuration and a TestRail level type to the Snapshots macro.
By the end of this page, you will have the TestRail extension installed and connected to your TestRail Cloud site.
TestRail Cloud only. This integration supports TestRail Cloud (sites ending in
.testrail.io). TestRail Server is not supported.
Before you start
-
These steps require administrator access on the Confluence Cloud site where Snapshots runs.
-
A TestRail Cloud account with permission to generate API keys.
-
A TestRail user whose permissions cover the test suites, runs, and plans you want to retrieve in snapshots. The integration reads TestRail data through this account, so its permission scope determines what Snapshots can see.
1. Install the TestRail extension on Confluence
-
In Confluence, open Settings → Atlassian Marketplace → Find new apps.
-
Search for
snapshots testrailand select Snapshots for TestRail Data into Confluence. -
Click Try it free, confirm the trial, and wait for the install to finish.
-
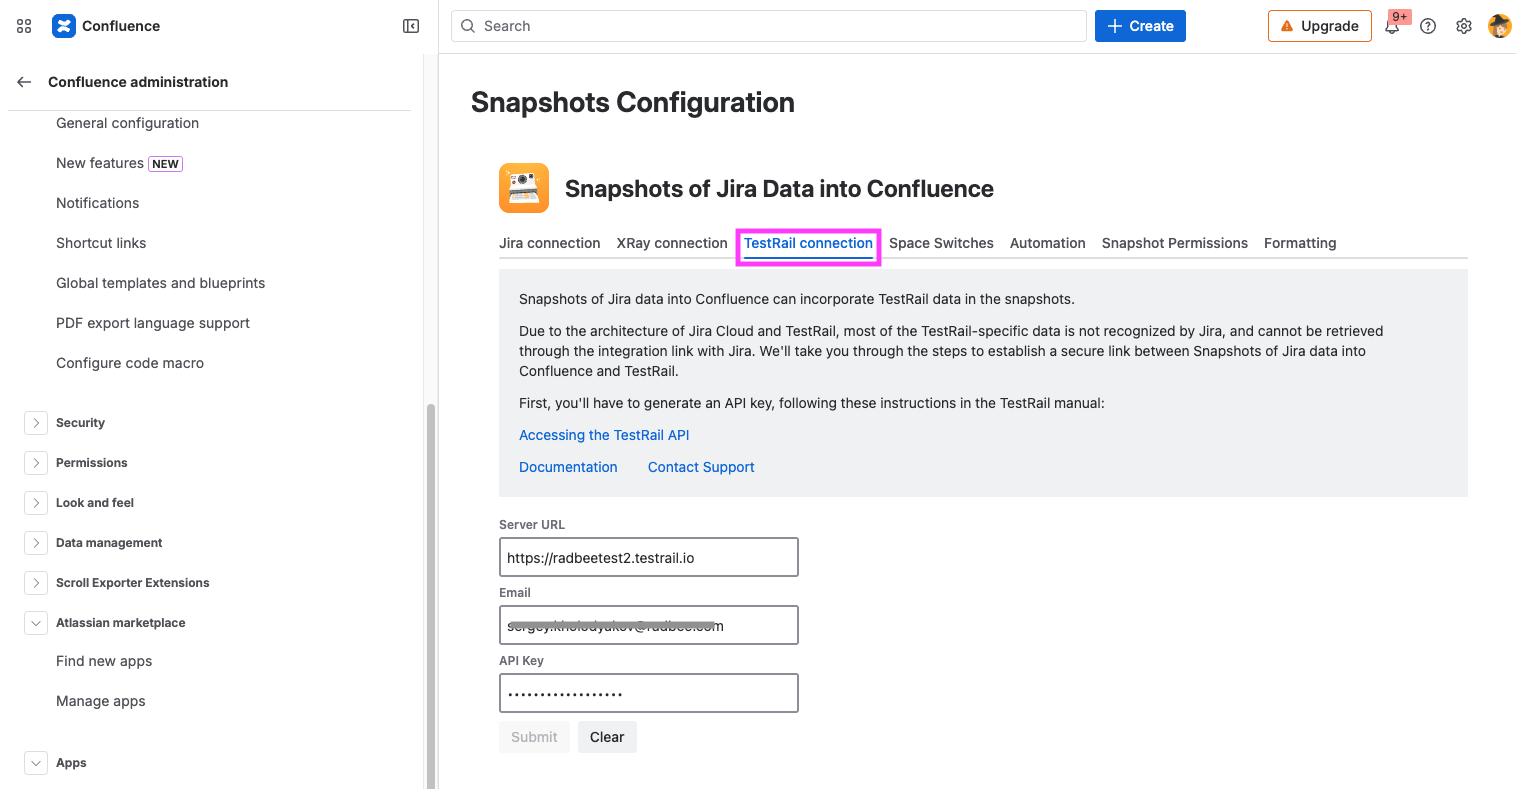
After installation, navigate to Settings → Apps → Snapshots Configuration → TestRail connection. The TestRail connection tab is part of the main Snapshots Configuration but only becomes available once the extension is installed.
2. Generate an API key in TestRail
-
In TestRail, click your user avatar at the top-right corner and select My Settings.
-
Open the API Keys tab.
-
Click Add Key and give it a meaningful name — for example,
snapshotsorsnapshots-<your-confluence-site>. The name only helps you identify the key later; it doesn't affect what the key can access. -
Click Generate Key. TestRail displays the key value once.
-
Copy the key and save it somewhere safe (a password manager works well). You'll need it in step 3 below.
-
Confirm the key by clicking Add Key.
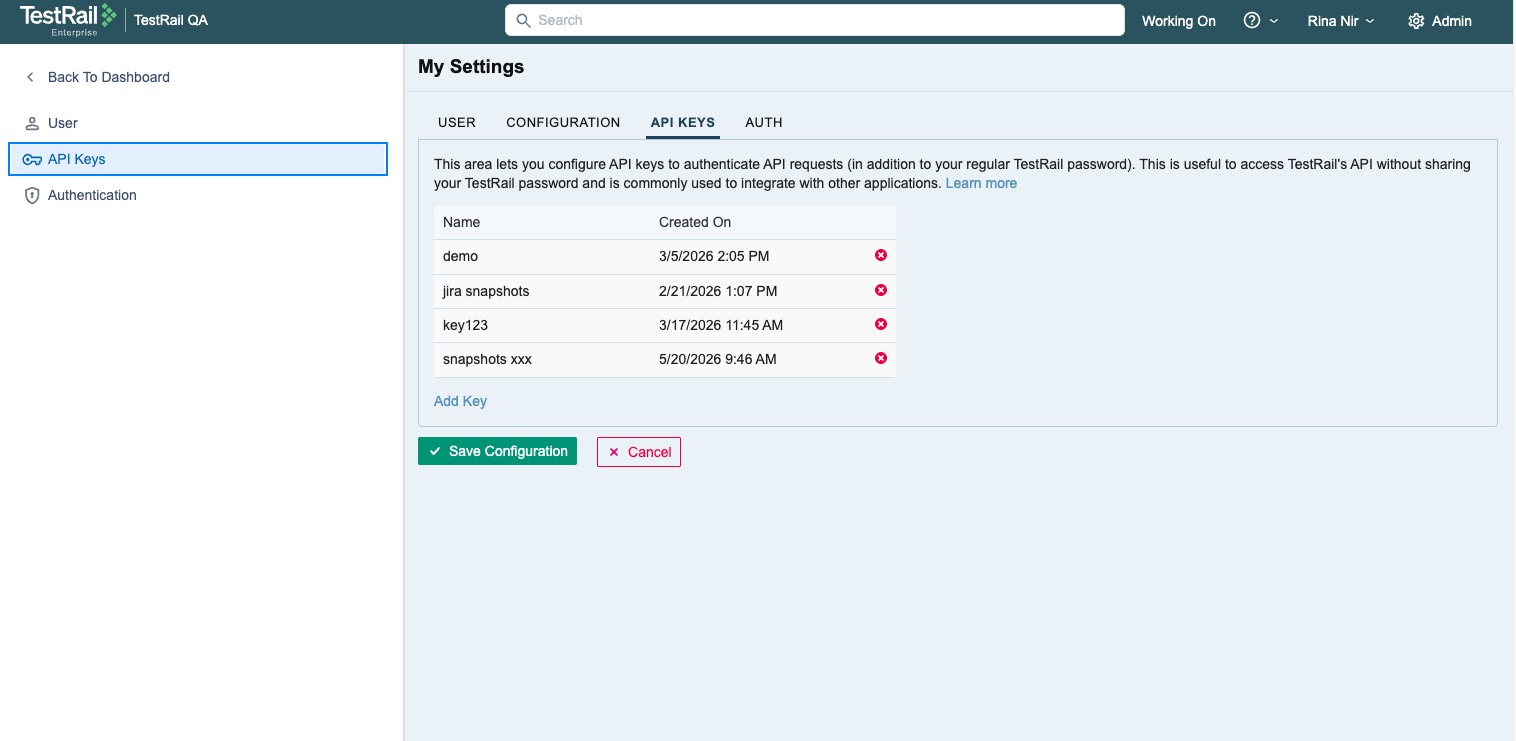
Important: save the configuration. After adding the key, scroll to the bottom of the My Settings page and click Save Settings. TestRail does not persist the key automatically; if you skip this step, the key will be discarded as soon as you leave the page.
To verify, refresh the page and re-open the API Keys tab. The new key should still appear in the list.
For more on TestRail API keys, see TestRail's documentation: Accessing the TestRail API.
What the key can access. A TestRail API key inherits the permissions of the TestRail user who generated it. Snapshots uses the key only for reading data, it never updates data in TestRail. Treat the key carefully, like a password.
3. Plug the credentials into Snapshots
-
In Confluence, return to Snapshots Configuration → TestRail connection.
-
Fill in the three fields:
-
TestRail site URL — your TestRail Cloud URL, ending in
.testrail.io(for example,https://radbytest.testrail.io). -
Email — the email address of the TestRail user who generated the API key. This is the same email used to log in to TestRail.
-
API key — paste the key you generated in step 2.
-
-
Click Submit.
If everything is correct, you'll see a success indicator confirming the connection. The integration is ready, and TestRail data can now be added to snapshots.
What's next
-
Integration with TestRail — overview of what the integration provides.
-
Adding TestRail data to snapshots — using TestRail fields in your snapshots.