A snapshot can capture more than a flat list of issues. By adding levels, you can show a hierarchy — for example, epics with their child stories, stories with their blockers, requirements with the tests that cover them. Most relationships available in Jira can be expressed as a snapshot level.
By the end of this page, you have a snapshot with two or more levels showing related issues from Jira.
Before you start
-
A page with a single-level Snapshots macro already configured. See Taking your first snapshot from Confluence if you need to create one.
-
A clear idea of which Jira relationship you want to show across levels (parent/child, blocked by, linked, sub-tasks, and so on).
How levels work
Each level has its own JQL search. Level 1 runs first and returns a set of issues. Level 2 runs for each issue in level 1 — and you reference level 1's results in level 2's JQL using a $ placeholder.
The most common reference is $key, which inserts the key of the level-1 issue into level 2's JQL. So a JQL like parent in $key reads as "for each level-1 issue, find all issues whose parent is that issue's key." You don't write the actual key; Snapshots substitutes it as it runs the search.
You aren't limited to $key — you can reference any field on the level-1 issue by name. If level 1 has a custom field called Manager (a user picker), level 2 can use assignee = $Manager to find issues assigned to the manager named on each level-1 row. The pattern is $<field name> for any field whose value Snapshots can substitute into the JQL.
Level 3 references level 2's results the same way, level 4 references level 3, and so on. There is no fixed depth limit — the practical limit is the width of your Confluence page once the table starts spreading out.
1. Add a second level
-
Edit the page and open the Snapshots macro configuration.
-
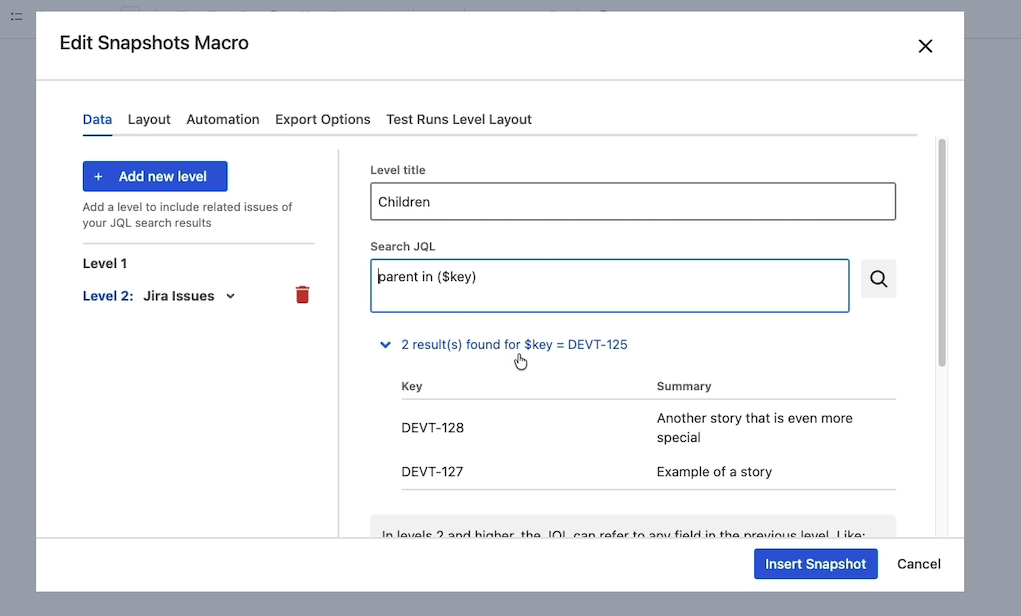
On the level configuration screen, click Add level. A second level appears with its own title, JQL, and field list.
-
Give the level a title — for example, Children.
-
Enter the JQL for the level. To capture parent/child relationships:
parent in $key -
Click Search preview to verify the relationship works. Snapshots runs level 1, then runs level 2 against the first level-1 issue's key, and shows the result. Confirm the children returned match what you'd see in Jira.
-
Add the fields you want to display in level 2. For example: Type, Key, Summary, Status.
-
Click Insert snapshot to save the configuration.
2. Take a new snapshot
The configured levels don't capture data on their own — Snapshots only retrieves what's in scope at the moment you take a snapshot. After adding (or changing) a level, take a new snapshot from the page so the new scope is captured.
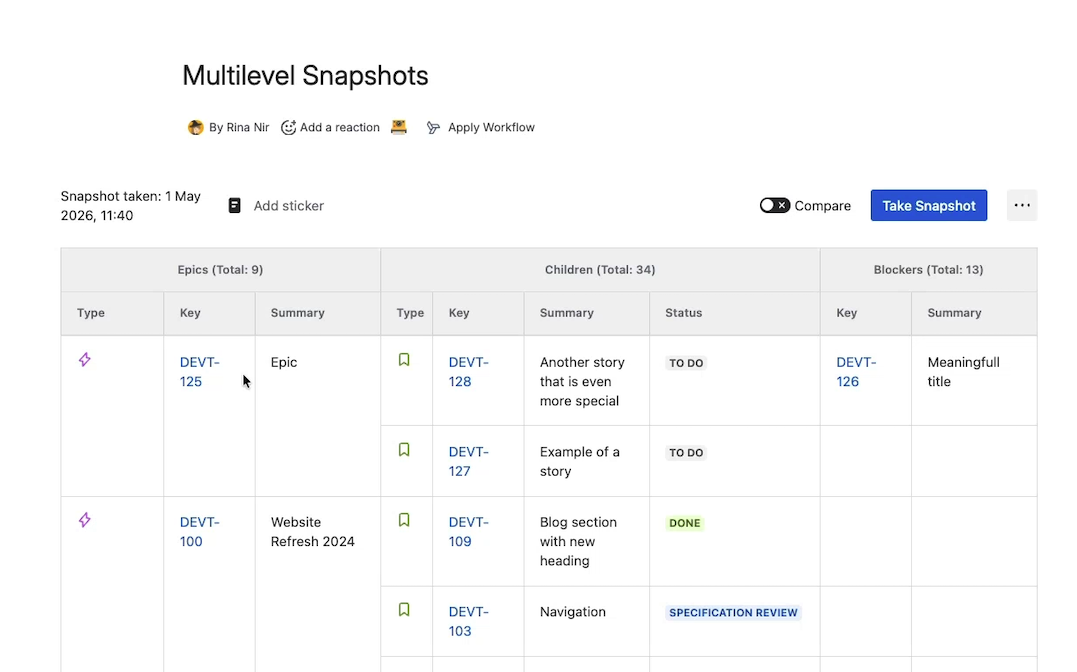
When the snapshot finishes, the table shows the level-1 issues on the left and their level-2 children stretched across to the right.
Tip: As you add columns, the table gets wider. In the macro layout settings, switch the page width to wide so the snapshot has more horizontal room.
3. Add deeper levels
To go beyond two levels, repeat the process. For example, to add a third level showing blockers of the level-2 issues:
-
Open the macro configuration and click Add level. A third level appears.
-
Give it a title — for example, Blockers.
-
Enter the JQL using a different relationship. To find issues that block the level-2 results:
issue in linkedIssues($key, "blocked by") -
Use Search preview to verify the level returns the expected linked issues.
-
Add the fields you want and Insert snapshot.
-
Common relationships you can express
|
Relationship |
Example JQL for the next level |
|---|---|
|
Parent / child issues |
|
|
Sub-tasks |
|
|
Blocked by |
|
|
Blocks |
|
|
Any link type |
|
|
Custom field reference (for example, a user picker) |
If level 1 has a user-picker custom field |
|
Tests covering a requirement (Xray) |
Practical limits
You aren't limited to three or four levels — Snapshots supports as many as your data justifies. Real-world examples go up to eight levels. Beyond that, the Confluence page becomes uncomfortably wide; consider whether the deepest level should be a separate page or a separate snapshot instead.
What's next
-
Display options on the Layout tab — for example, switch to "full grid" so each row has a complete set of values across levels.
-
Grouping rows by a field — restructure the level-1 view by grouping on a column.
-
Sorting, filtering, and grouping on the page — manipulate how the multi-level table displays at view time.